Flowers
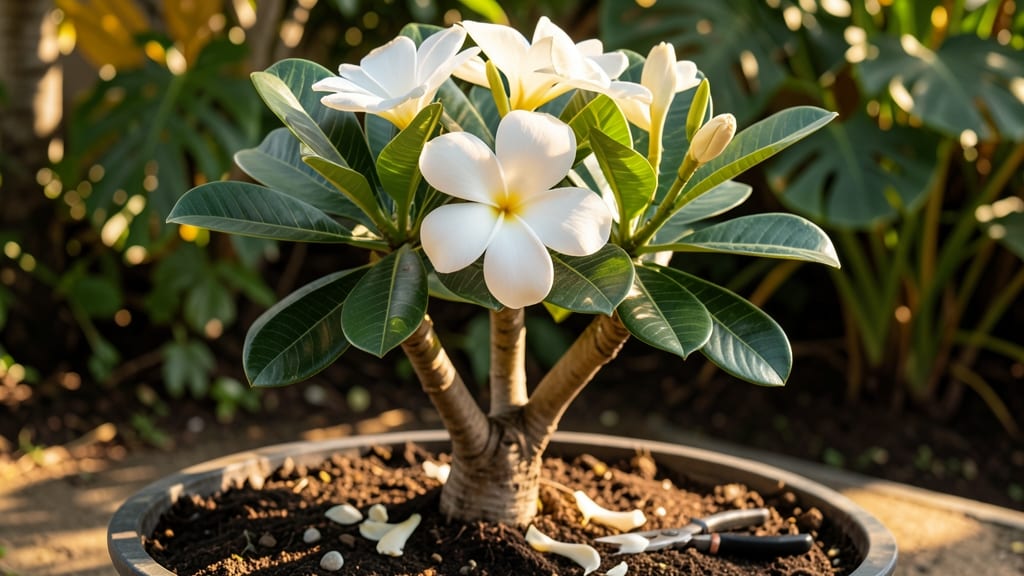
The white plumeria flower (Plumeria alba) brings a touch of paradise to patios and balconies with its creamy blooms and intoxicating fragrance. 🌸 I fell for this plant after struggling with other tropicals that wilted in my zone 10 heat—this one thrives when given the right care, and the scent alone makes it worth growing.
Container culture is perfect for white plumeria since they dislike soggy roots and need excellent drainage. You’ll need a pot with drainage holes, a well-draining cactus/succulent mix, and a spot where they’ll bask in full sun (6+ hours daily)—even partial shade can reduce blooms.
The key is mimicking their native tropical environment without overcomplicating things.
By summer’s end, you’ll be rewarded with clusters of snow-white, waxy blooms that perfume the air at dusk. The plants grow slowly but steadily, reaching 3-5 feet tall in containers, and with proper pruning, they’ll keep flowering year after year. The fragrance alone makes it a standout in any collection.
Whether you’re a first-time grower or expanding your tropical lineup, white plumeria adapts beautifully to containers. The real secret? Less water, more sun, and occasional feeding—simple rules that lead to stunning results. Let’s get those cuttings growing!
📚 In This Guide
- What you need
- Instructions
- Tips and common mistakes
- Wrapping up and next steps
What you need
- ● White Plumeria Cuttings (or Nursery-Grown Plants): 3–5 healthy cuttings (4–6 inches long, with 2–3 nodes)
- ● OR 1–2 potted nursery-grown plants (3–5 gallons container size)
- ● Well-Draining Potting Mix: 50% cactus/succulent mix (for aeration)
- ● 30% perlite or pumice (for drainage)
- ● 20% orchid bark or coconut coir (for structure)
- ● Containers: 1–2 fabric grow bags (5–7 gallons) or terracotta pots (with drainage holes)
- ○ Optional: Elevation tray or saucer (to prevent root rot)
- ○ Rooting Hormone (Optional but Helpful): 1 small bottle (e.g., Clonex or Rootone)
- ● Pruning Shears: 1 pair (sterilized with rubbing alcohol)
- ● Bright, Indirect Light: 6+ hours of morning sun (avoid harsh afternoon rays)
- ● Watering Can with Narrow Spout: 1 (to avoid over-saturating soil)
- ● Balanced Fertilizer: 1 bottle 20-20-20 liquid fertilizer or slow-release granules
- ● Humidity Tray or Peat Moss (for Humidity Lovers): 1 small tray (to mimic tropical conditions)
- ● Mulch: Pine bark or coconut chips (to retain moisture)
- ● Support Stakes: For tall varieties (3–4 feet)
- ● pH Test Kit: To monitor soil acidity (ideal: 6.0–7.0)
- ● Insecticidal Soap: For aphid/pest prevention
Step-by-Step guide to growing white plumeria flowers in containers
Here's how to coax these fragrant tropical beauties to thrive in pots with minimal fuss.
🌱 Step 1: Select the Right Container and Drainage
Plumerias despise soggy roots, so choose a container with multiple drainage holes at least 12 inches deep for mature plants. I prefer terra cotta pots because they wick away excess moisture through their walls. If using plastic, add extra holes along the sides to prevent root rot.
Place ½ inch of perlite or pumice at the bottom before adding soil. This creates an air pocket that prevents waterlogging while allowing roots to breathe. For 4 plants, you'll need 4 containers—each with its own drainage system. Avoid saucers unless they're shallow with drainage holes too.
☀️ Step 2: Prepare the Soil Mix for Tropical Growth
Plumerias thrive in fast-draining, airy mixes that mimic their native volcanic soil. Combine 60% cactus/succulent mix, 20% perlite, and 20% orchid bark for the perfect balance. This blend prevents compaction while retaining just enough moisture to satisfy thirsty roots.
Sterilize the mix by baking it in the oven at 200°F for 30 minutes to kill pathogens. Let it cool completely before filling containers to 1 inch below the rim. The soil should feel light and crumbly—like a damp sponge—never dense or clay-like.
🌿 Step 3: Plant and Acclimate Your Plumeria Cuttings
Take 4-inch cuttings from healthy stems (they should have 3-4 nodes) and let them dry for 24 hours to form a callous. Dip the cut end in rooting hormone to encourage faster growth. Insert each cutting 2 inches deep into the prepared soil at a 45-degree angle—this mimics their natural growth habit.
Gently firm the soil around the cutting to eliminate air pockets. Place the container in a bright, indirect light spot (like an east-facing window) for the first 2 weeks. Avoid direct sun until new growth appears—this prevents scorching the delicate cutting. Water lightly only when the top inch of soil feels dry.
💧 Step 4: Establish a Watering and Fertilizing Routine
Once roots establish (after 4-6 weeks), switch to a weekly watering schedule during the growing season. Stick your finger 2 inches into the soil—water only when it's completely dry. Overwatering is the #1 killer of plumerias, so never let water pool in the saucer.
Feed with a balanced 20-20-20 fertilizer diluted to ½ strength every 2 weeks from spring to fall. In winter, reduce feeding to once a month as growth slows. I use a slow-release fertilizer in early spring to provide steady nutrients without risking root burn.
✂️ Step 5: Prune and Encourage Blooming
After the first frost or when growth slows in winter, trim back one-third of the plant to encourage bushier growth. Use clean, sharp shears to make cuts just above a leaf node. This pruning also removes dead or diseased branches, improving airflow and reducing pests.
To trigger blooming, expose your plumeria to full sun for 6+ hours daily and reduce water slightly. When buds form, avoid shaking the plant—plumerias drop buds easily. Once flowers open, enjoy their intoxicating fragrance (especially strong in the evening). Deadhead spent blooms to encourage more flowers.
Tips & tricks for perfect white plumeria flower growth
These pro tips will help you avoid common pitfalls and maximize your plumeria's potential—so you get fragrant blooms without the stress.
Container Selection: In Step 1, terra cotta pots are ideal because they wick moisture away through their porous walls, but plastic containers work too—just drill extra drainage holes along the sides. For 4 plants, I recommend using individual containers instead of one large planter. This prevents root competition and makes it easier to monitor each plant's moisture needs. If you notice water pooling in the saucer, immediately empty it—plumerias hate soggy feet!
Soil Sterilization: The 200°F for 30 minutes sterilization in Step 2 is non-negotiable. I sterilize my soil mix in batches on a baking sheet lined with parchment paper. This kills fungal spores and bacteria that could rot your cuttings before they even take root. After baking, let the soil cool completely before use—hot soil can shock your delicate cuttings.
Cutting Preparation: Don't skip the 24-hour drying period for your cuttings in Step 3. This callusing step prevents rot by allowing the wound to seal over. Pro tip: Use a fan on low setting during this period to speed up drying while preventing fungal growth. Also, make sure your cuttings have 3-4 nodes—these are where roots will emerge, so more nodes mean more potential roots!
Light Transition: After the initial 2-week bright indirect light period in Step 3, gradually introduce your plumerias to more direct sunlight. I move mine to a south-facing window over 7-10 days, increasing exposure by 1 hour each day. This slow transition prevents sunburn on the tender new leaves. Watch for yellowing leaves—this is your signal to move them to more shade temporarily.
Pro Tips for White Plumeria Flower
- These pro tips will help you avoid common pitfalls and maximize your plumeria's potential—so you get fragrant blooms ...
- Container Selection: In Step 1, terra cotta pots are ideal because they wick moisture away through their porous walls...
- Soil Sterilization: The 200°F for 30 minutes sterilization in Step 2 is non-negotiable. I sterilize my soil mix in ba...
Frequently asked questions
Got questions about growing white plumeria flowers?
You’re not alone! Here are answers to the most common concerns—from care tips to troubleshooting—so you can keep your tropical beauty thriving.
How often should I water my white plumeria?
Water your plumeria when the top 1-2 inches of soil feel dry. Overwatering is the #1 killer! In containers, this usually means every 5-7 days, but adjust for heat/humidity. Yellow leaves? You’re likely watering too much.
How long does it take for a white plumeria to bloom?
With proper care, expect blooms in 1-2 years for container-grown plants. Young plants focus on roots first, but mature plumerias (3+ years) can flower year-round in warm climates. Patience pays off—those fragrant blooms are worth the wait!
Can white plumeria survive winter?
Plumerias are tropical and need protection below 50°F (10°C). Move potted plants indoors (bright light, 50-60°F) or mulch heavily outdoors. No frost! If leaves drop, it’s normal—regrowth happens in spring.
Why aren’t my white plumeria leaves turning green?
Yellowing or pale leaves often mean nutrient deficiency (try a balanced fertilizer) or poor drainage. Check for root rot if leaves look mushy. Pro tip: Prune leggy growth to encourage bushier, healthier foliage.
Are there white plumeria alternatives for colder climates?
Yes! Try frangipani hybrids (like ‘Iceberg’) or Arabian jasmine for milder climates. For containers, gardenia or hibiscus offer similar tropical vibes (but with less fragrance). Just ensure they get enough sunlight!
Wrapping up and next steps
Growing white plumeria flowers in containers is a rewarding journey that brings fragrant tropical beauty to your space! With the right care—sunlight, well-draining soil, and patience—you’ll soon be greeted by their intoxicating scent and stunning blooms.
Whether you’re a beginner or a seasoned gardener, this fragrant companion is worth the effort.
Ready to take the next step? Start with a healthy cutting or seedling and give it the love it deserves—your garden (and nose!) will thank you. 🌸✨